How to use Busy Calendar Mirror
Busy Calendar Mirror
Copy the events of your private calendars into a shared calendar as plain Busy blocks, preview every change, and keep the blocks in step from the menu bar.
Bought Busy Calendar Mirror? Sign in with the email you bought it with to download the latest version or ask me a question.
On this page
Install
Busy Calendar Mirror requires macOS 14 Sonoma or later, on Apple silicon or Intel. Download the ZIP from the order page or your Creem receipt. Unzip it and move the app to Applications.
The app checks for updates once a day. When a new version is ready, click Install and Relaunch. To check anytime, choose Busy Calendar Mirror → Check for Updates….
For help, choose Help › Busy Calendar Mirror Support. It opens the support site in your browser.
Allow Calendar access
The first time you open the app, click Allow Calendar Access…. macOS asks once: choose Allow Full Access. The app reads when your events start and end in the calendars you choose, and writes Busy blocks into the one calendar you pick. It never copies titles, people, places or notes, and never changes your own events.
If access was refused, or given as “add events only”, an orange banner appears with Open Privacy Settings. In Privacy & Security › Calendars, give Busy Calendar Mirror full access, then click Check Again.
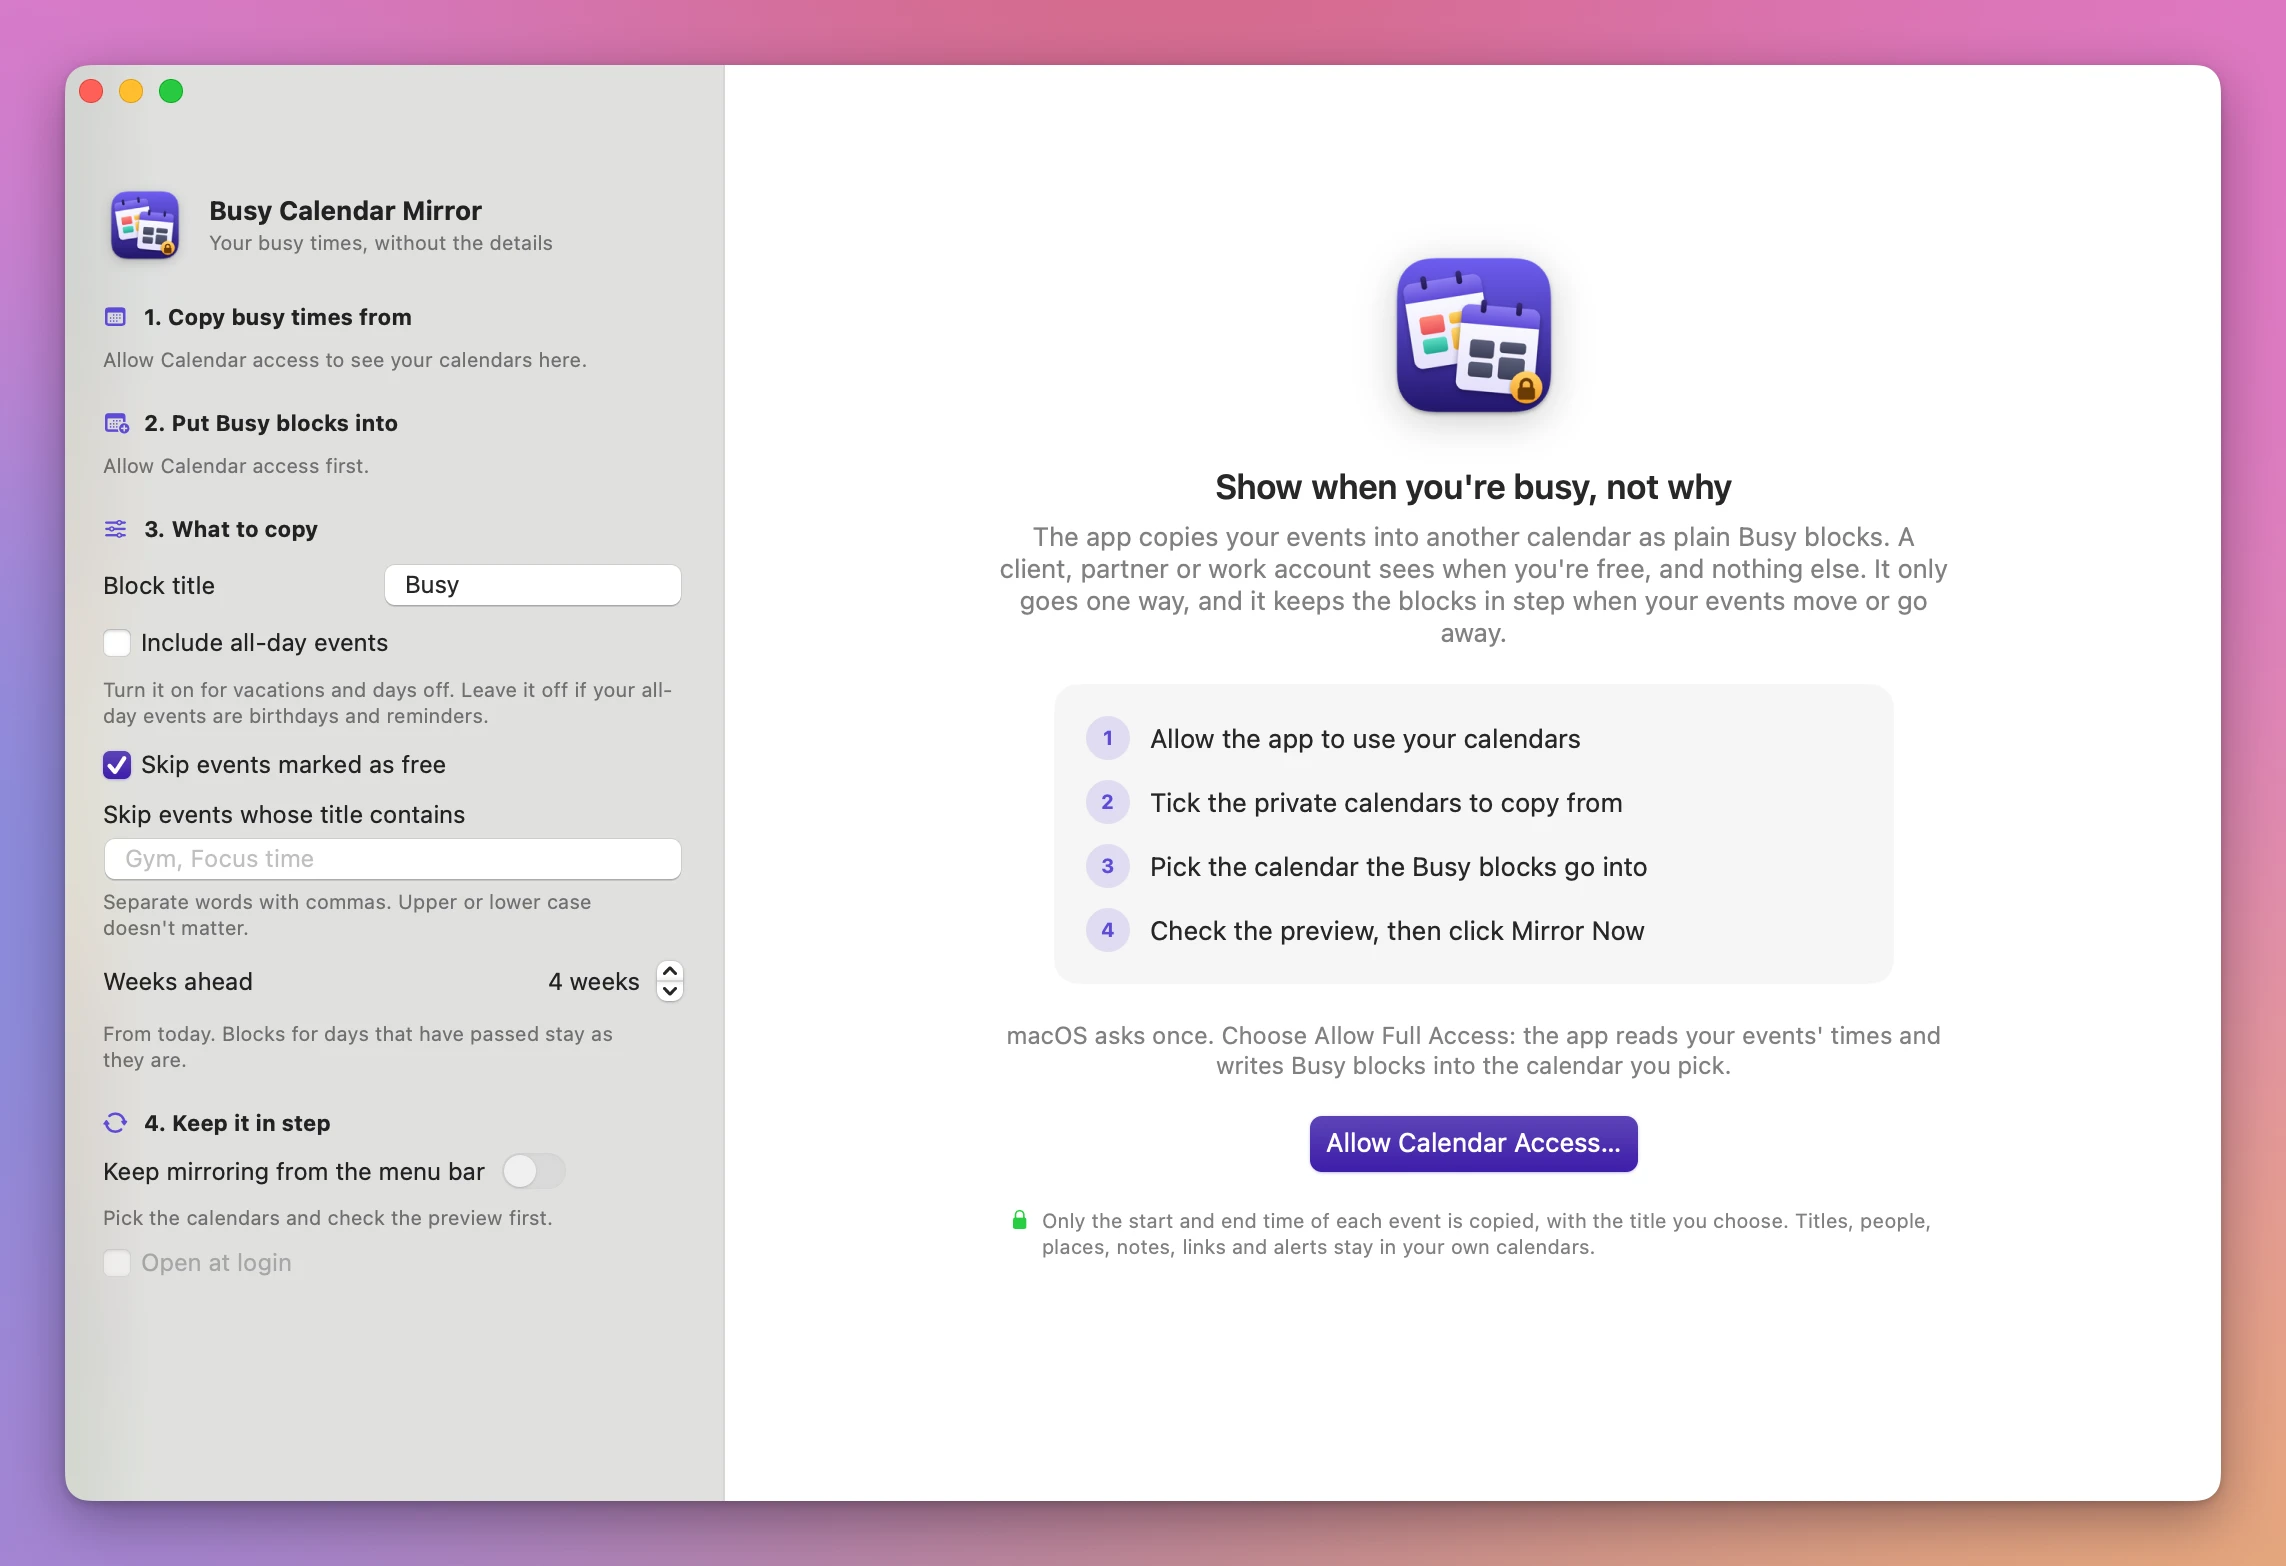
1. Copy busy times from
Every calendar on your Mac is listed with its color and its account (On My Mac, iCloud, Google…). Tick the private calendars whose events should show as busy. The calendar you picked as the target is marked “target” and can’t be ticked.
2. Put Busy blocks into
Pick the calendar the other person sees: the one you share with a client, partner or work account. The list only has calendars you can write to and that aren’t ticked above. Read-only, subscribed and birthday calendars are left out.
The app never changes events in the target that it didn’t make. A meeting someone else put there stays as it is.
To make a new one, click Make a New “Busy” Calendar…, type a Name (“Busy” by default), choose the account under In and click Make Calendar. Make it in the account the other person can see, like iCloud or Google, then share it with them in Calendar. Some accounts, Google among them, may not let the app make a calendar: the app tells you, and you can make it in Calendar or on the web and pick it from the list.
If the settings stop making sense (the target was deleted, became read-only, or is also a source), the app says so in a plain sentence.
3. What to copy
- Block title: the title of every block, “Busy” by default. “Not available” or “Blocked” work too. Changing it retitles the existing blocks on the next mirror.
- Include all-day events: off by default. Turn it on for vacations and days off. Leave it off if your all-day events are birthdays and reminders.
- Skip events marked as free: on by default. Works for iCloud, Google and Exchange events. Calendars On My Mac don’t store free or busy, so their events always count.
- Skip events whose title contains: words separated by commas, like
gym, focus time. Upper or lower case doesn’t matter. - Weeks ahead: 1 to 26 weeks, 4 by default, from today. Blocks for days that have passed stay as they are.
Canceled events and invitations you declined are always skipped.
The preview
Once access is allowed and the calendars are picked, the main area shows Preview:
The lists:
- Will be added: events that don’t have a block yet.
- Will move: events whose time changed, with “Was Sat, Nov 21, 10:00 AM – 11:00 AM”, or blocks that get a new title.
- Will be removed: blocks whose event was deleted, moved out of these weeks, or is skipped now.
- Already mirrored: events whose block is already right.
- Skipped: with the reason, like all-day event, marked as free, title matches a skip word, left out by you, canceled, declined, or same time as another event (the same meeting in two calendars gets one block).
Event names appear in the preview so you know what’s what. They’re shown only to you, and never written to the target.
Click Leave Out on an event to keep it off the shared calendar. It moves to Skipped, where Include brings it back.
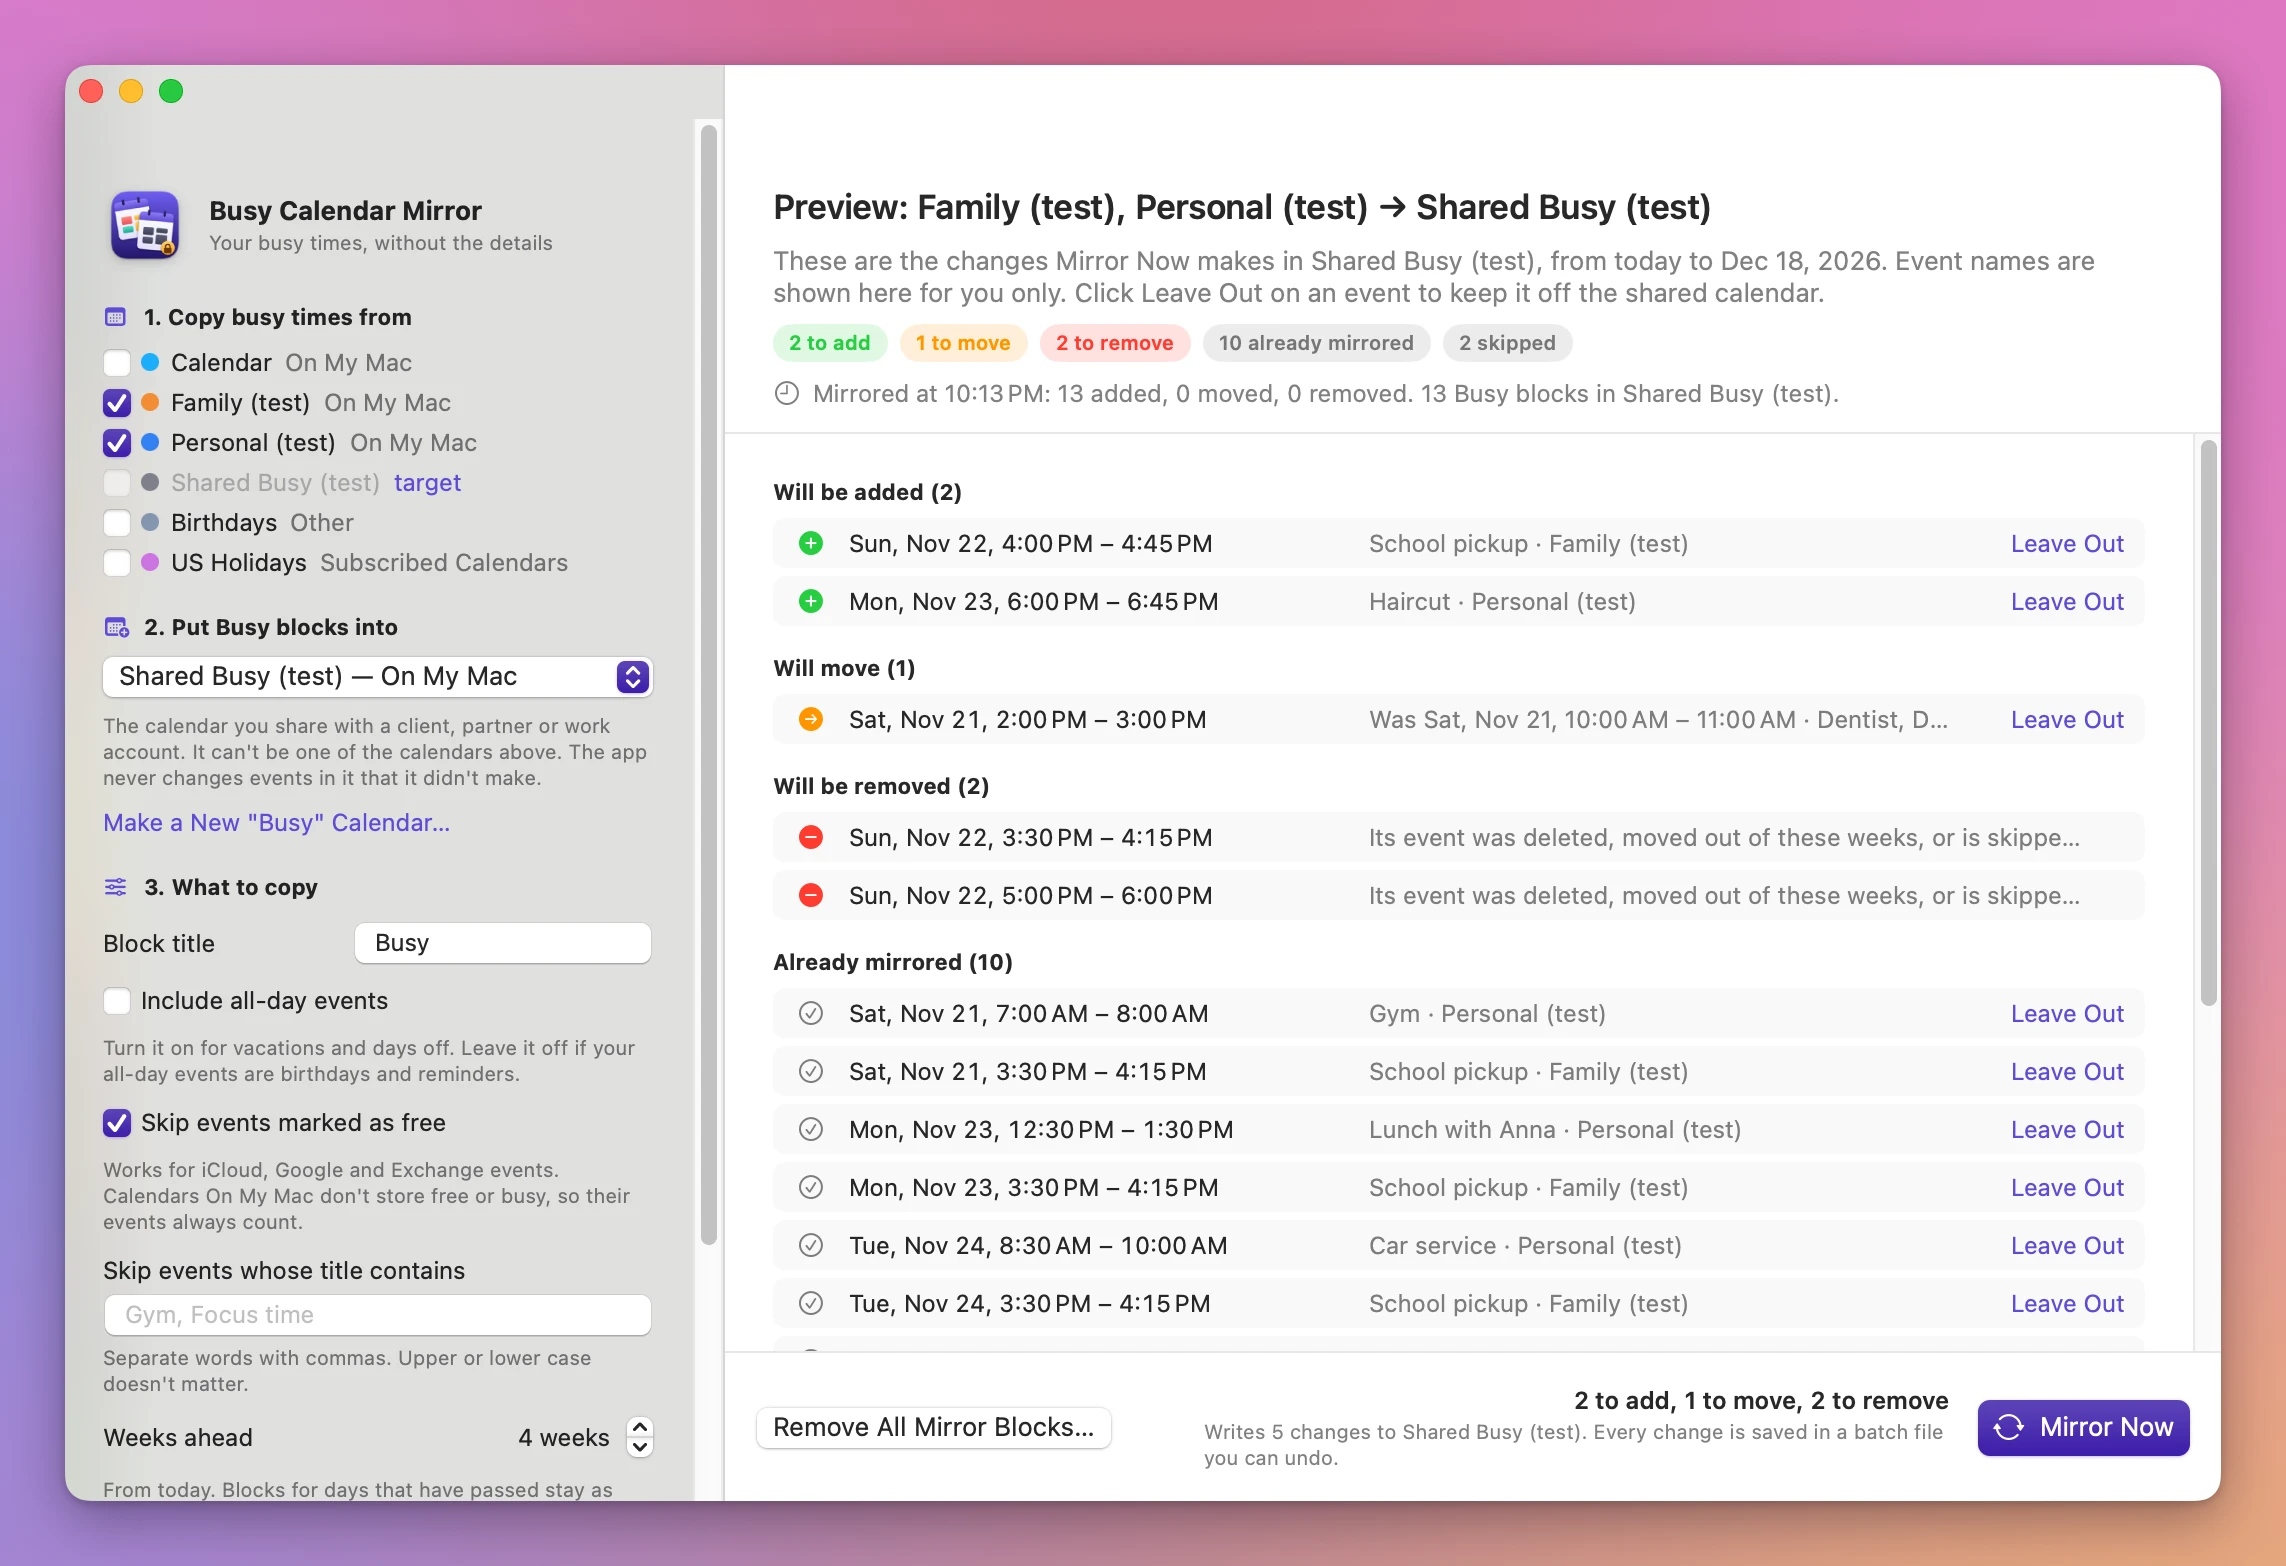
A line under the lists counts the other events in the target that the app didn’t make. They stay exactly as they are.
Mirror Now
Click Mirror Now (Command-Return). The done screen says Mirrored into
- Show the Batch File shows the record of this mirror in the Finder.
- Undo This puts the target back the way it was.
- Back to the Preview checks again.
When the target already matches, the preview says “Everything is already mirrored”, with Check Again (Command-R).
Keep it in step
Turn on Keep mirroring from the menu bar under 4. Keep it in step. The app mirrors right away, then whenever your calendars change and every 15 minutes, without a preview. Closing the window keeps it running in the menu bar.
The menu bar menu shows the last sync, how many calendars go into which target, Mirror Now, Open Busy Calendar Mirror, Stop Mirroring (which brings the window back) and Quit. The icon turns into a warning calendar when the last sync had a problem.
Open at login becomes available once Keep mirroring is on, and adds the app to your login items.
The blocks only update while your Mac is awake and the app is running. When the Mac has been off, the next sync catches up.
Undo and Remove All
Every mirror, removal and undo is saved as a batch file with the times and the block codes, never the titles, in ~/Library/Application Support/Busy Calendar Mirror/History. Mirror › Show Batch Files opens the folder.
Mirror › Undo Last Mirror undoes the last mirror or removal. If Keep mirroring is on, undo turns it off, so the next sync doesn’t redo the changes. The app tells you when that happens.
Remove All Mirror Blocks…, at the bottom of the preview or in the Mirror menu, asks first. Every event the app made in the target is removed, including ones for days that have passed. Events you or others made there stay. Keep mirroring turns off, and you can undo it from the Mirror menu.
How the app finds its own blocks
Each block stores a mirror code, made from the source calendar and the event (and the date, for one occurrence of a repeating event), never from its title. The code is in the block’s link and in its notes (“Busy time copied by Busy Calendar Mirror. Mirror code: …”), so servers that drop the link still work. The app only moves or removes events that carry a code it expects. Don’t copy a block’s link or notes into your own events.
Limits
- It goes one way, from your calendars to the target.
- A single moved occurrence of a repeating event shows in the preview as one block removed and one added. The result in the target is the same as a move.
- Past blocks are never touched by a sync. Only Remove All Mirror Blocks… removes them.
- Tested with calendars stored On My Mac. Targets in iCloud, Google and Exchange, and how fast their copies reach other people, haven’t been tested. Skip events marked as free, declined invitations and canceled events were checked in the app’s automated tests only.
Everything happens on your Mac through macOS. The Busy blocks sync through your calendar account like any other event. The app uses the internet only to check for updates.
Command line
The app includes a command line tool, busy-calendar-mirror, inside the app at Contents/Helpers/. It uses the app’s saved settings, and options apply to one run only.
busy-calendar-mirror plan [options] [--json]          Preview adds, moves, removals. Changes nothing.
busy-calendar-mirror sync [options] [--json]          Mirror now.
busy-calendar-mirror remove-all [--target NAME] --yes Remove every block the app made.
busy-calendar-mirror undo [--json]                    Undo the last sync or removal.
busy-calendar-mirror calendars [--json]               Calendars, IDs, whether they can be a target.
busy-calendar-mirror status [--json]                  The last sync as a sentence.
Options: --source NAME|ID (repeat), --target NAME|ID, --title TEXT, --all-day or --no-all-day, --skip-free or --include-free, --skip-title WORD (repeat), --weeks N.
The commands that read Calendar need Calendar access for the app you run them from, like Terminal.
Busy Calendar Mirror is $19, a one-time purchase.