How to use Desktop Interval Capture
Desktop Interval Capture
Take a screenshot of a window, a display or an area every few seconds, scrub through the frames on a timeline, and export a time-lapse MP4.
Bought Desktop Interval Capture? Sign in with the email you bought it with to download the latest version or ask me a question.
On this page
Install
Desktop Interval Capture requires macOS 14 Sonoma or later, on Apple silicon or Intel. Download the ZIP from the order page or your Creem receipt. Unzip it and move the app to Applications.
The app checks for updates once a day. When a new version is ready, click Install and Relaunch. To check anytime, choose Desktop Interval Capture → Check for Updates….
Allow Screen Recording
macOS asks before any app can see your screen. Until the permission is on, the app shows a screen that explains why, with three steps:
- Click Open System Settings. It also adds the app to the list.
- Turn on Desktop Interval Capture in Screen & System Audio Recording.
- If macOS asks, choose Quit & Reopen. Otherwise come back to the app.
The screen checks again every 2 seconds. Check Again checks right away, and Quit & Reopen restarts the app, which macOS sometimes needs before the permission works.
Start a session
Click New Session in the sidebar. The New capture session screen has four parts.
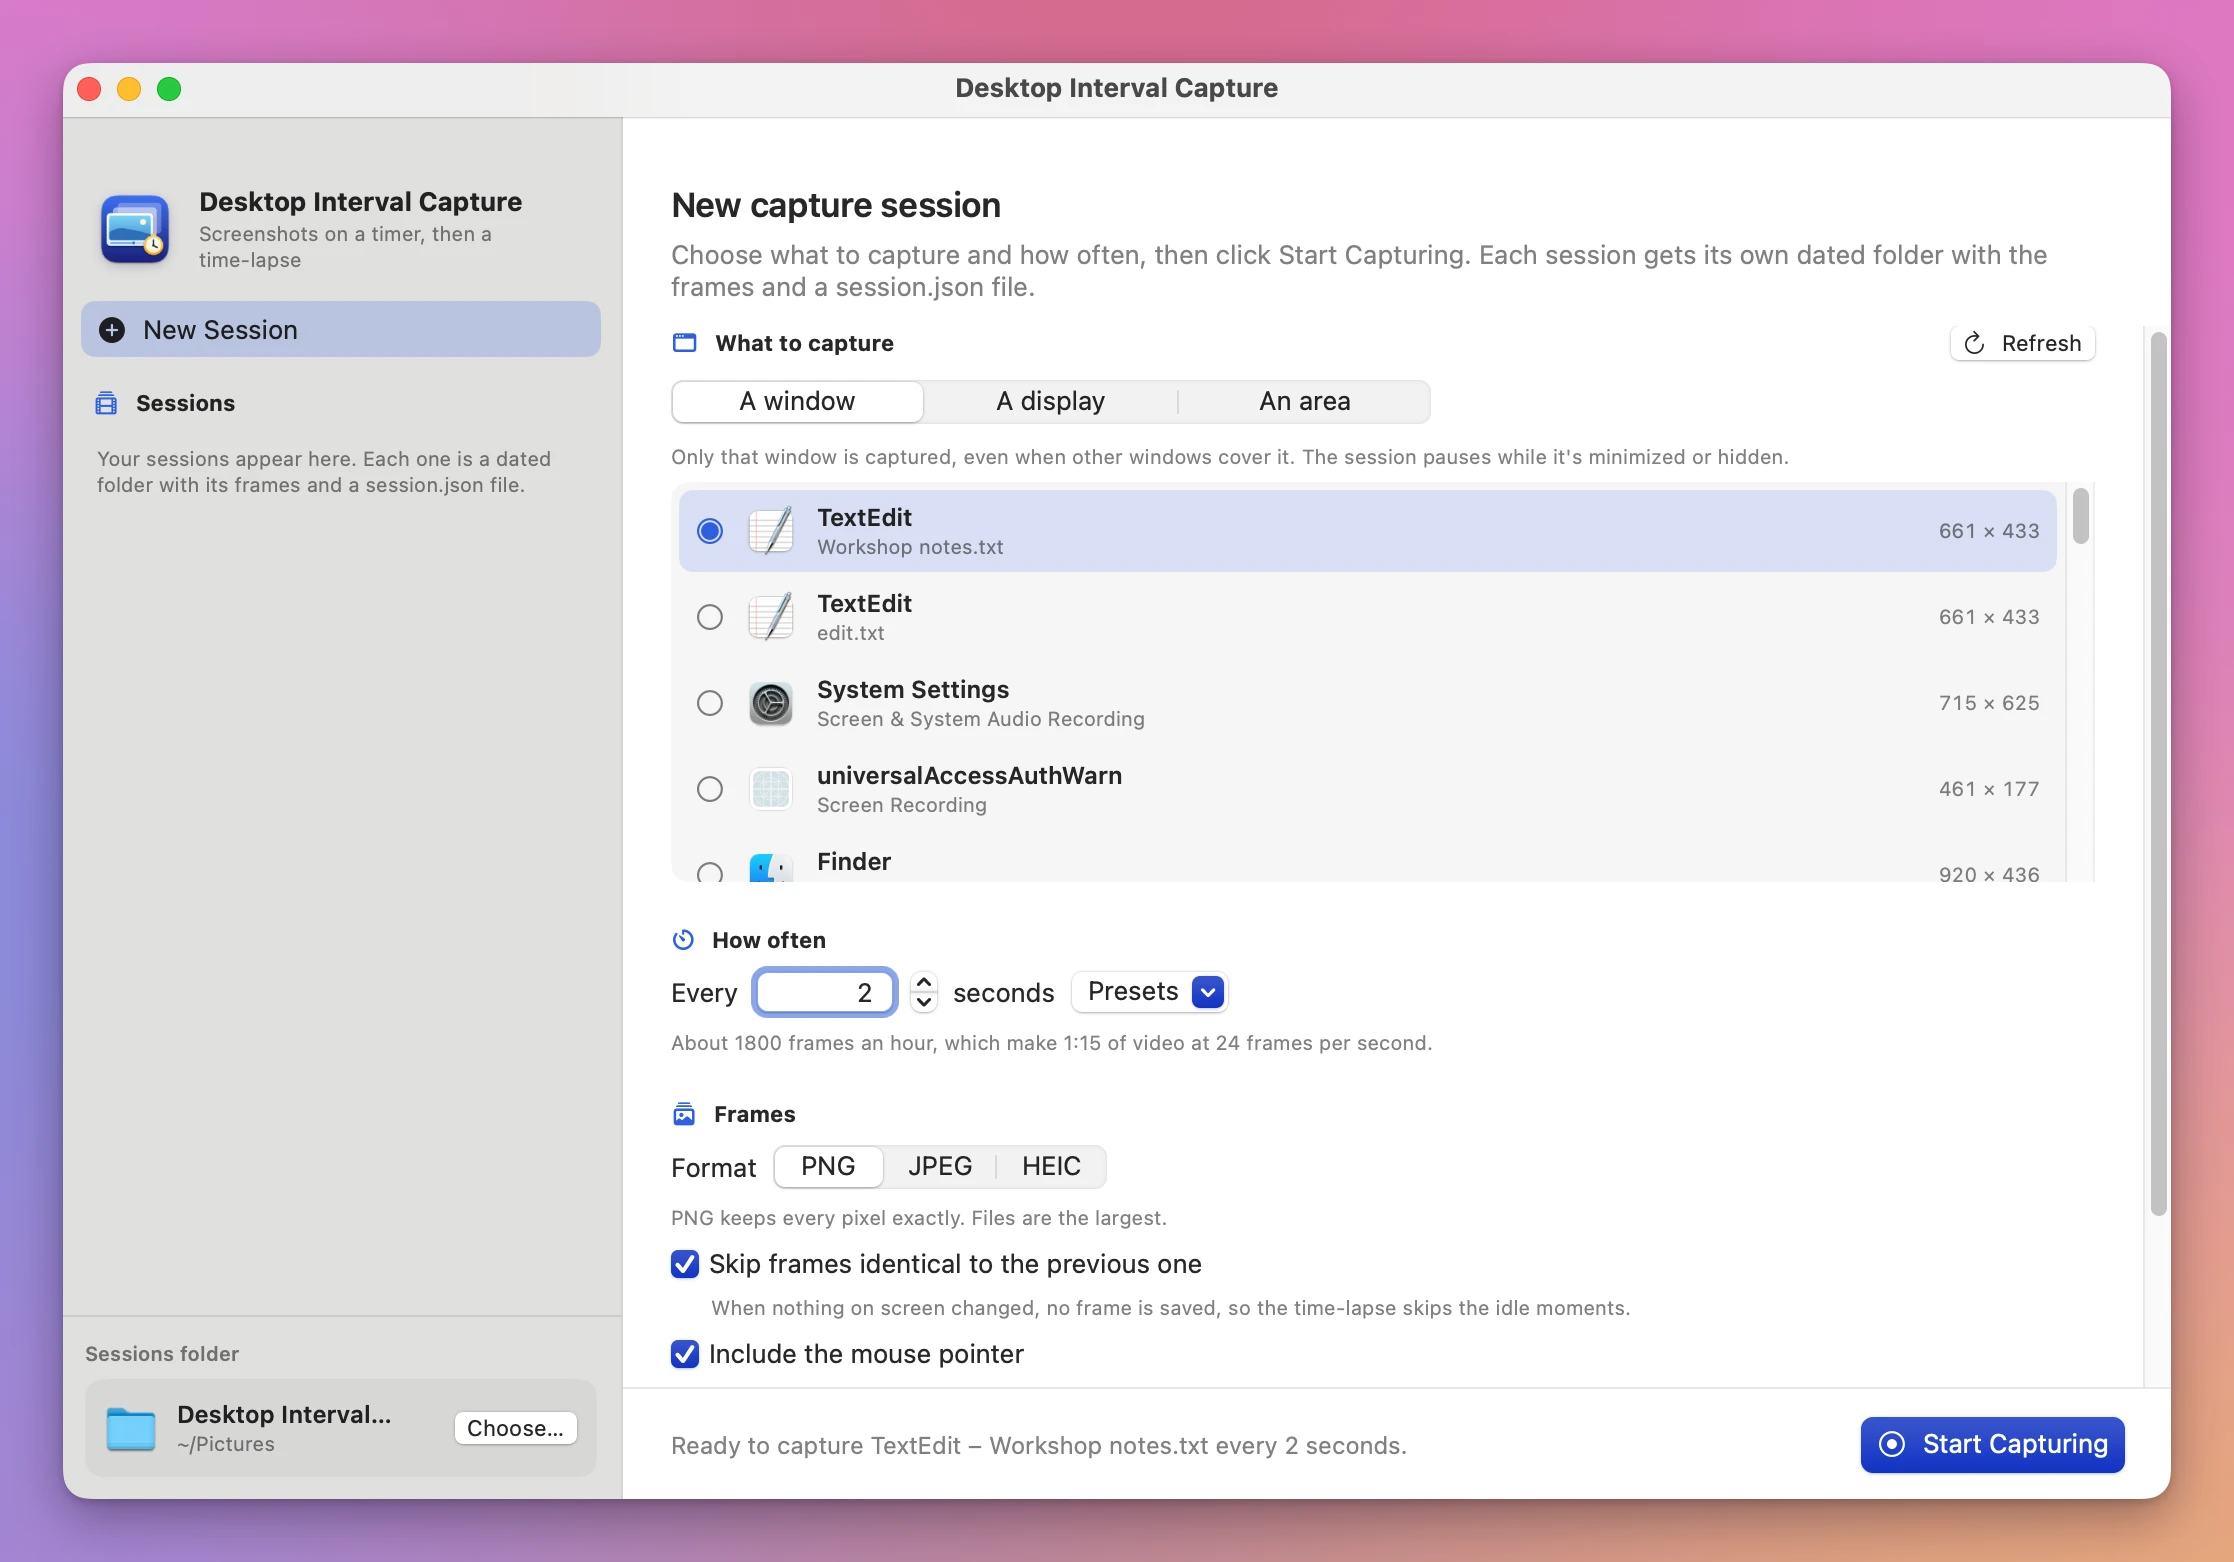
What to capture
- A window lists every window with its app icon, app name, title and size, the front-most first. Only that window is captured, even when other windows cover it. Refresh updates the list.
- A display captures a whole screen.
- An area: click Draw Area…, then drag a rectangle over the screen. The overlay shows the size and the top-left corner in points. Esc cancels. On a Mac with several displays, pick the display first.
How often
Type the number of seconds, use the arrows, or pick from Presets (1 second to 10 minutes). The line underneath says how many frames an hour that makes and how much video at 24 frames per second. A value outside 1 to 600 seconds shows a red sentence and turns off Start Capturing.
Frames
- Format: PNG keeps every pixel. JPEG and HEIC are smaller, with a quality slider.
- Skip frames identical to the previous one: when nothing changed on screen, no frame is saved.
- Include the mouse pointer.
Storage
Stop the session when its frames reach N GB, 5 GB by default.
The footer says what’s missing, or “Ready to capture … every N seconds”. Click Start Capturing (⌘R).
While it captures
The window shows a red dot and the source, pills with the frames, the identical frames skipped, the space used out of the limit, the running time and the format, and the latest frame. Pause and Stop are at the bottom. The Session menu has Pause (⇧⌘P) and Stop Session (⌘.).
You can close the window: the session keeps running. The menu bar shows a record icon and the frame count, with Pause or Resume, Stop Session and Show Desktop Interval Capture. Quitting the app while a session runs asks first.
The session pauses on its own, and records each pause with its reason:
- while the screen is locked
- while the Mac is asleep
- for a window, while it’s minimized, hidden or on another desktop
It stops with a sentence that says why when the window closes, the display is disconnected, the frames reach the storage limit, the disk has less than 1 GB free, or 3 screenshots in a row fail. Every frame saved so far is kept.
The timeline
Click Stop, or click a past session in the sidebar. The header shows the frames, the interval, the time covered, the size, the format, the identical frames skipped and the pauses, plus the reason the session stopped if it wasn’t you.
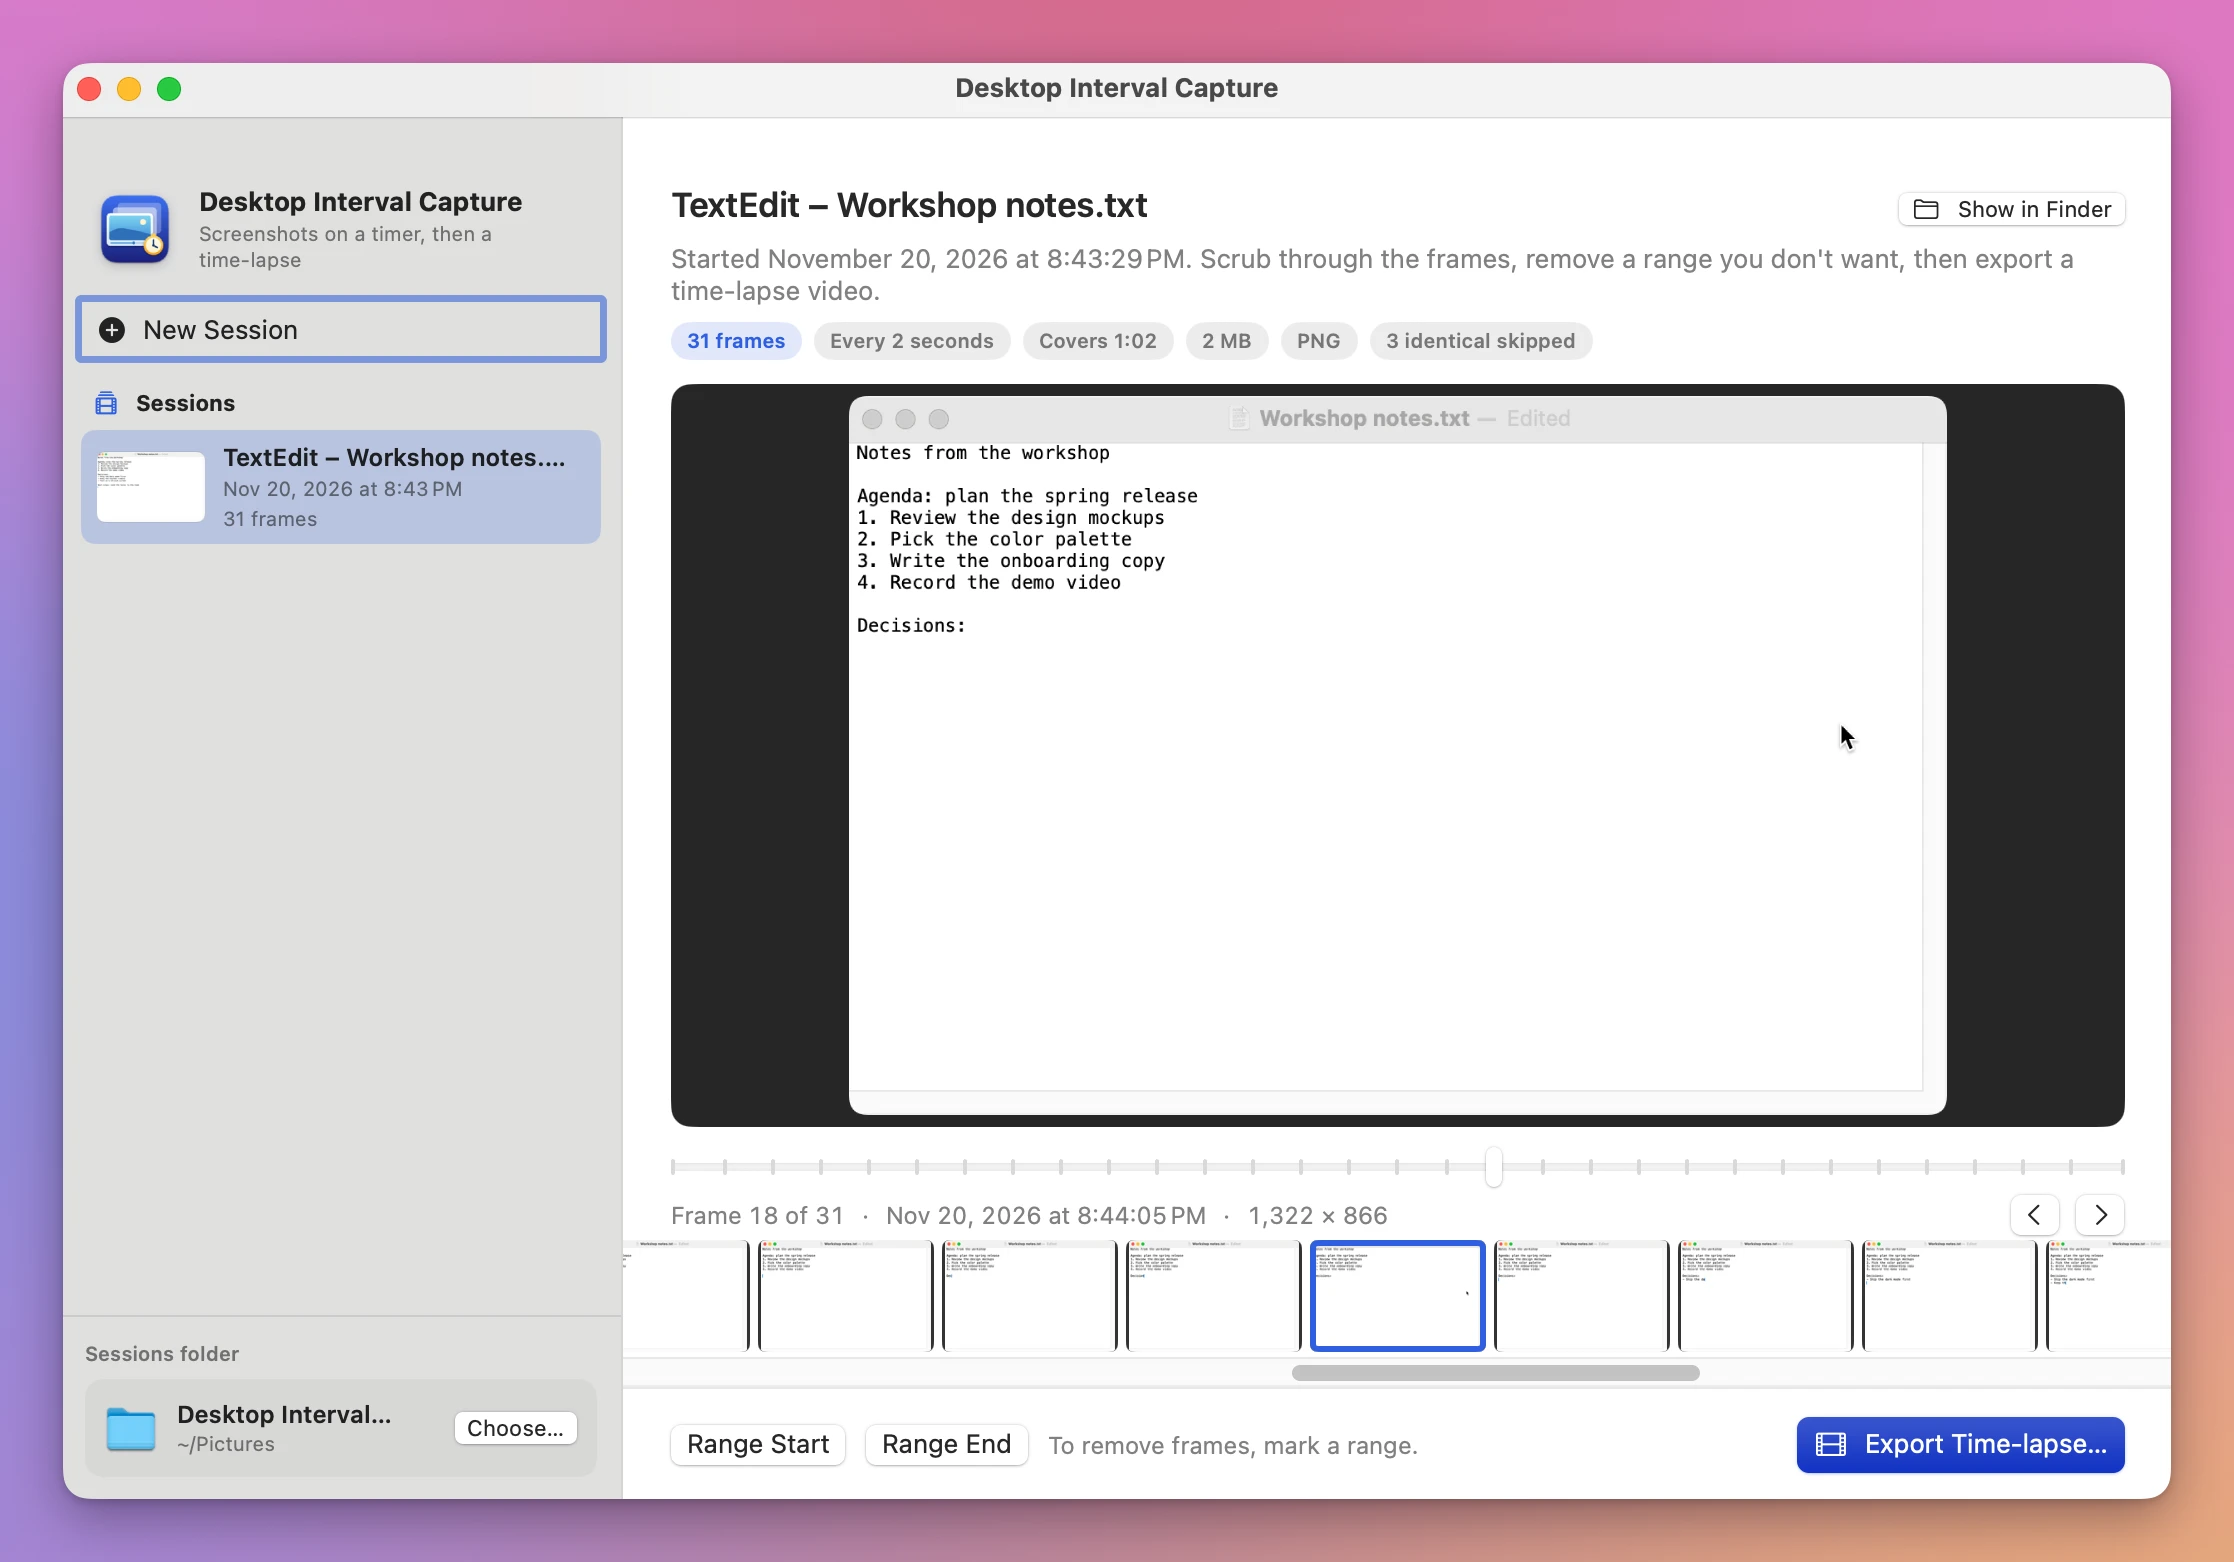
Drag the slider, press ← and →, or click a thumbnail in the filmstrip. To remove part of the session, go to its first frame and click Range Start, go to its last frame and click Range End, then click Delete N Frames… and confirm. The files go to the Trash and session.json is updated. Show in Finder opens the session’s folder.
Export a time-lapse
Click Export Time-lapse… (⌘E).
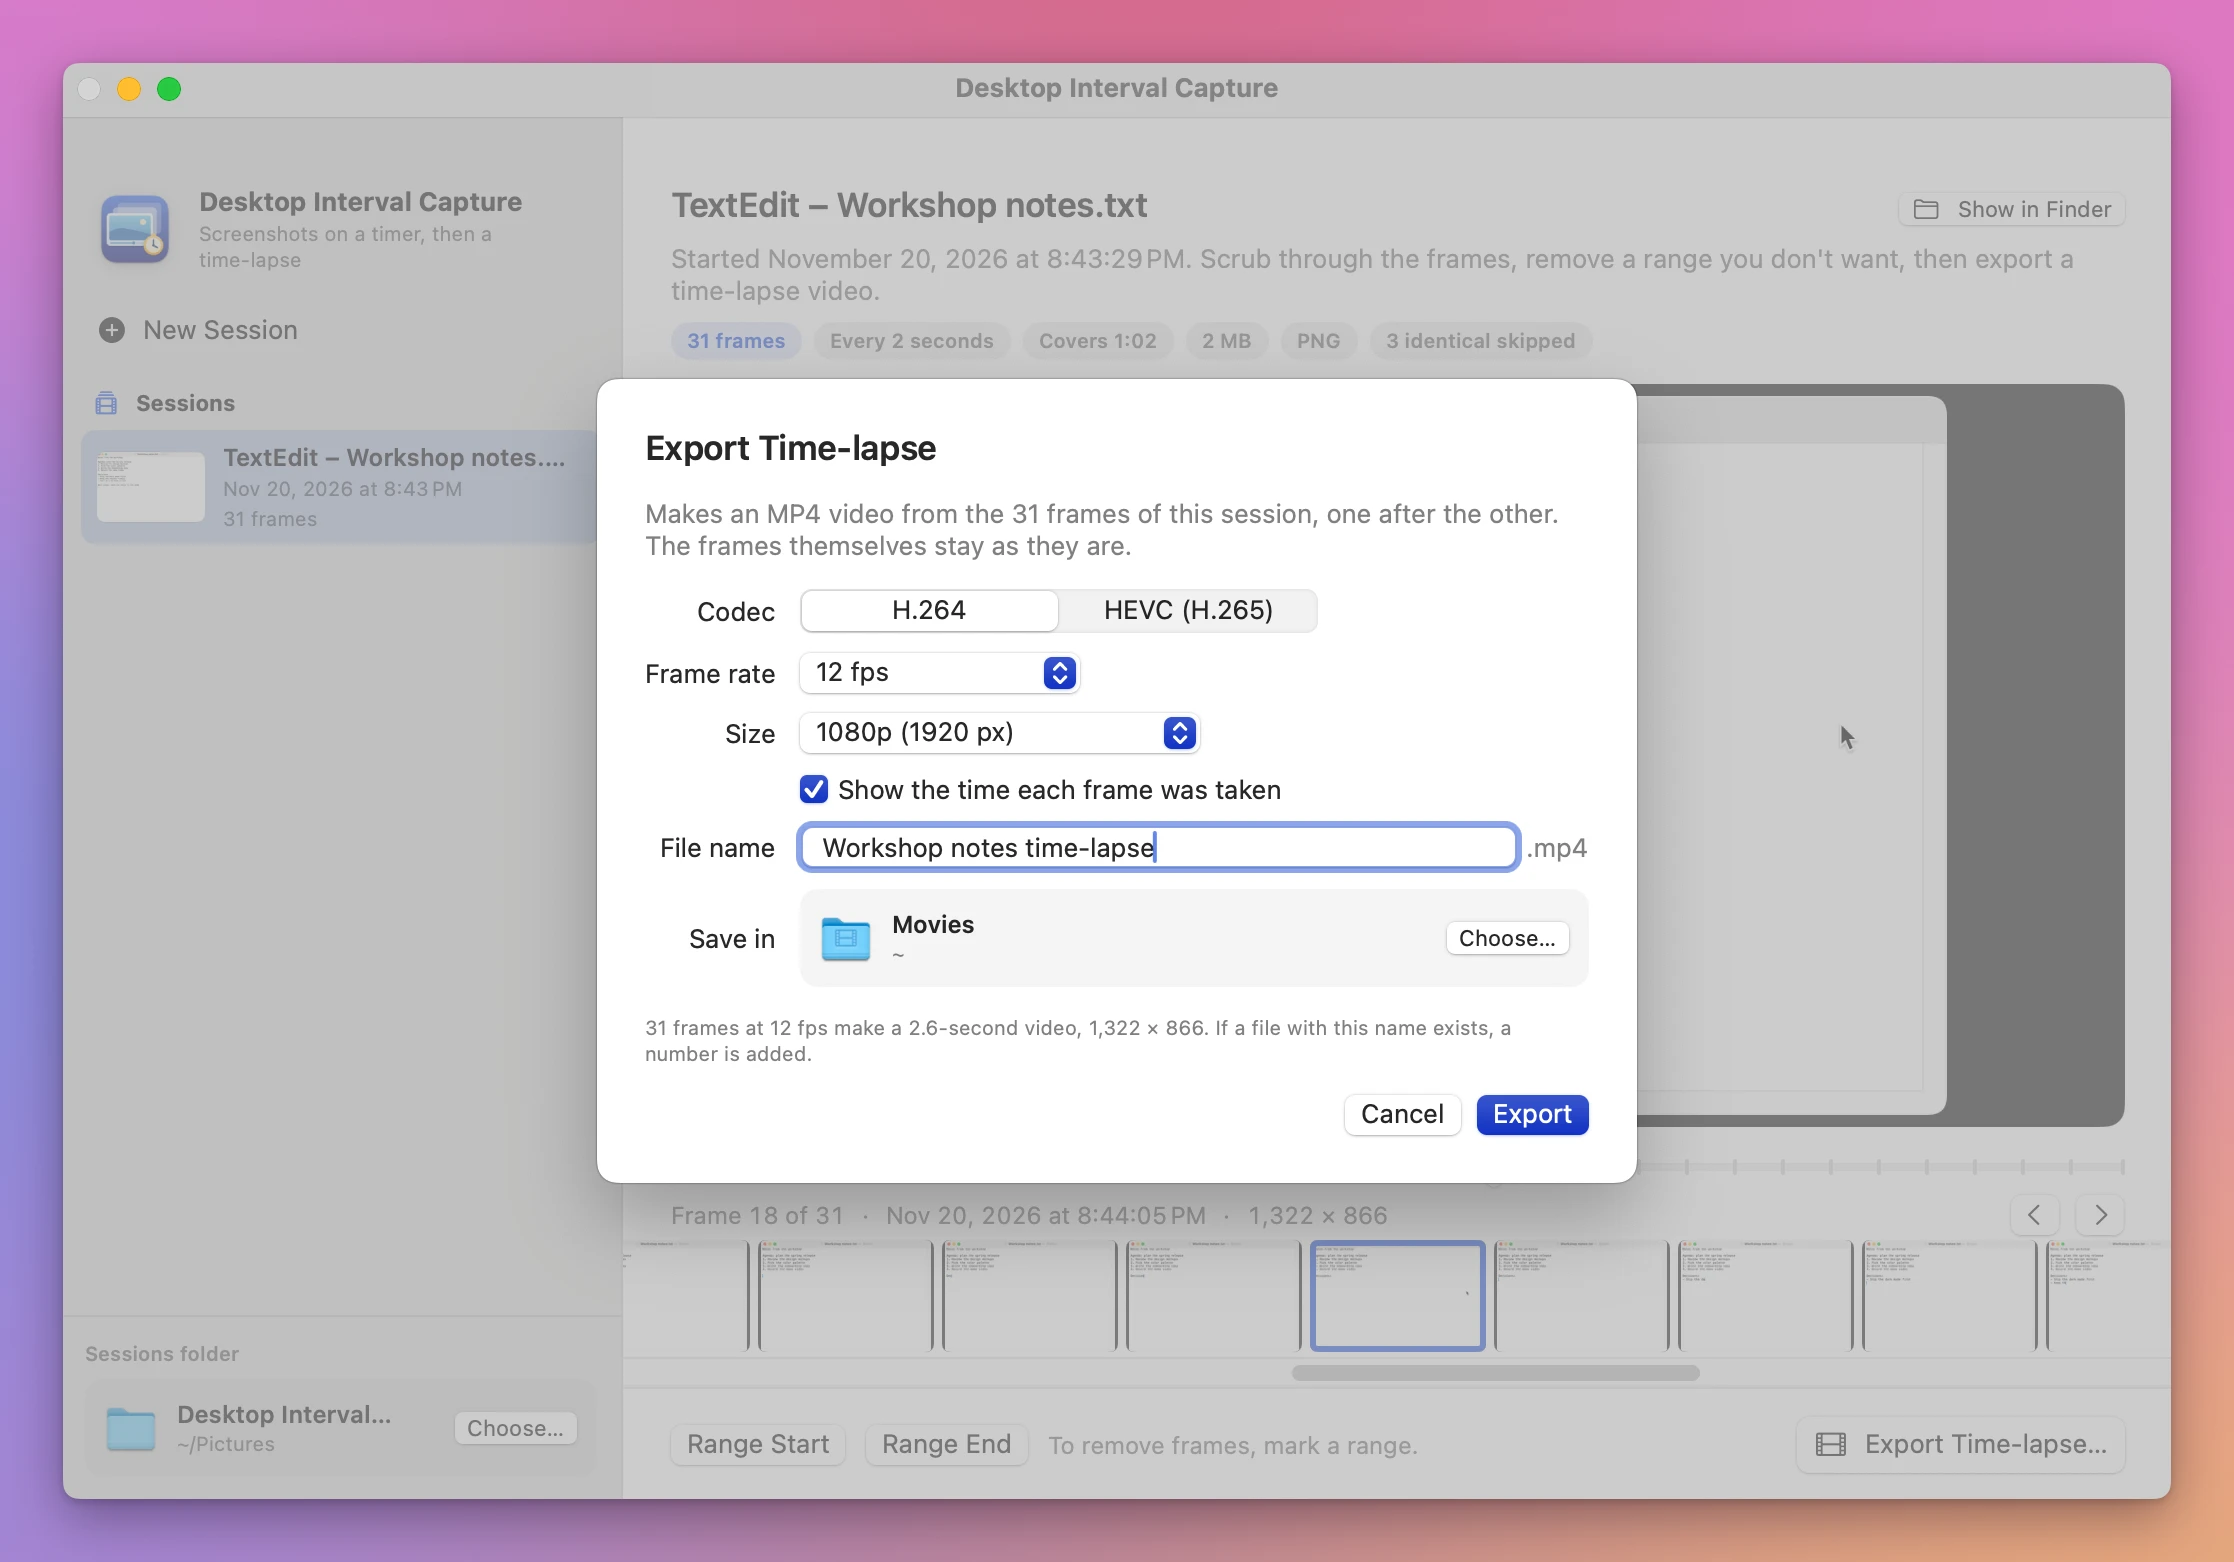
- Codec: H.264 or HEVC (H.265).
- Frame rate: 12, 24, 30 or 60 fps.
- Size: Original size, 4K (3840 px), 2560 px, 1080p (1920 px), 720p (1280 px) or 720 px, measured on the long side. A video is never made bigger than the frames.
- Show the time each frame was taken writes the capture time on every frame of the video.
- File name and Save in. The folder is Movies to start with, and the app remembers your choice.
A sentence under the settings says how long the video will be and its size. If a file with that name exists, a number is added (” 2”, ” 3”). A progress bar shows the export, with Cancel. When it’s done, the app shows the file, the frames, the length, the size, the frame rate and the codec, with Show in Finder, Play and Done.
The export only reads the frames. It never changes them.
Where the sessions are
Each session is a folder in Pictures/Desktop Interval Capture, named with the date, the time, the app and the window, like 2026-11-20 at 20.43.29 – TextEdit – Workshop notes.txt. Choose… under Sessions folder in the sidebar picks another folder.
Inside are the frames, frame-000001.png and on, and session.json: the source, the settings, the capture time and size of every frame, the pauses with their reasons, the identical frames skipped, the deleted frames and the reason the session stopped.
Things to know
- A window session keeps that window. If its app quits and opens the window again, it’s a new window, and the session stops with “the window was closed”. Start a new session.
- A window that changes size gives frames of different sizes. In the video, each frame is fitted inside the first frame’s size, on black.
- The export uses every frame of the session. Delete a range first to leave it out.
Command line tool
The app includes a command line tool at Desktop Interval Capture.app/Contents/Helpers/desktop-interval-capture. It needs Screen Recording for the app you run it from, like Terminal.
List the windows and displays you can capture:
desktop-interval-capture sources --jsonCapture the main display every 5 seconds for 10 minutes, as JPEG, into a folder. Ctrl-C stops cleanly:
desktop-interval-capture capture --display main --interval 5 --duration 600 --format jpeg --out ~/Pictures/CapturesOther options: --window ID, --region X,Y,W,H, --count N, --quality 0.1-1, --skip-identical, --no-pointer, --limit-gb GB and --json.
List sessions, and export one as a 30 fps HEVC video no larger than 1280 px with timestamps:
desktop-interval-capture sessions
desktop-interval-capture export "$HOME/Pictures/Desktop Interval Capture/2026-11-20 at 20.43.29 – TextEdit – Workshop notes.txt" --codec hevc --fps 30 --max-size 1280 --timestamps
Export also takes --out FOLDER, --name NAME and --json. desktop-interval-capture capabilities lists what the tool can do, and --version prints its version.
Frames and videos are made on your Mac. The app uses the internet to check for and download updates.
Desktop Interval Capture is $19, a one-time purchase.